For CH & CS Models
For T & A Models
For Charcoal & Wood Fired
For CH & CS Models
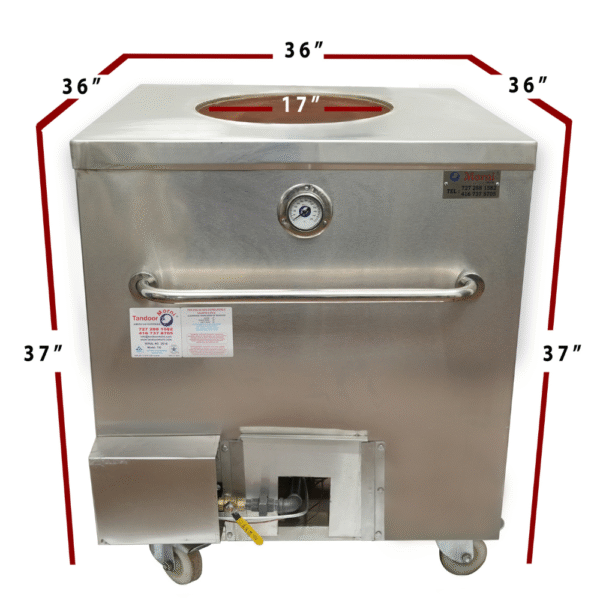
Operation Manual for CH & CS Models
(CH02, CH04, CH06, CS01, CS02)
Note: This appliance is designed for indoor use only and must be operated under a ventilation hood.
Our Certifications

Warnings & Recommendations
- Certified Technician: Always have a certified technician install and connect your tandoor to the main gas line. Never try to connect it yourself, as this may pose serious safety risks.
- Flexible Hose: The technician should use a blue, CSA-certified flexible hose to connect the tandoor. Additionally, a quick disconnect option is recommended for safety.
- Securing the Tandoor: To ensure safety, secure the tandoor to the wall using a chain.
- Lid Management: Avoid fully covering the top and side lids while the tandoor is in use because this can lead to excess heat buildup, potentially damaging gas components and causing the clay to crack.
- Cleaning: Clean the interior floor every 3-4 days in order to remove burnt residue. This way, you can prevent health risks and protect the gas components from damage.
Lighting the Tandoor
Before lighting, inspect all hoses and gas supply lines for any visual damage, such as nicks, cracks, or cuts. If any damage is found, do not use the tandoor.- Remove the Lid: Always remove the tandoor lid before igniting so that you can avoid accidents.
- Flame Check: Avoid leaning over the tandoor when igniting the burner. Furthermore, check the flames visually each time. If the flame is small or appears smoky and yellow, turn off the tandoor and contact a certified technician.
- Note: Always light the Tandoor from side window. Never ignite it from the top.
Step-by-Step Guide: Lighting up the CH Model Tandoors for the First Time:
Gas Valve Operation
- Pilot Valve: The yellow gas valve outside controls the gas flow to the pilot. Before lighting, ensure the other two gas valves are in off position. Turn on the pilot gas valve and ignite the pilot through the side window.
- Burner Valves: Gradually turn on the other two gas valves to light the burners, adjusting the heat as needed. This way, you can control the temperature precisely.
Note: Never operate the tandoor at full heat capacity because this can damage gas components and crack the clay. If the pilot and burners do not light, turn off all three valves.
Shutting Down the Tandoor
- Nightly Shutdown: Turn off the burner gas valves at the front while keeping the pilot lit so that it’s ready for the next use.
- Complete Shutdown: Turn off the main gas valve before the Flexible Gas Hose, along with the gas valve in the front to completely shut down the tandoor.
Safety Precautions
- Flammable Materials: Keep gasoline or other flammable substances away from the tandoor as well as other appliances.
- Assembly & Maintenance: In order to prevent hazards, ensure the tandoor is properly assembled, installed, and maintained.
For Your Safety
if you smell gas:- Shut off the main gas supply to all the appliances.
- Extinguish any open flames.
- Remove the tandoor lid.
- If the smell persists, contact your gas supplier or fire department immediately.
Installation Guidelines
This appliance must comply with local codes and be installed indoors under a ventilation hood.For Your Own Safety
- Only use the tandoor indoors and under a ventilation hood because this ensures proper ventilation.
- In addition, keep the area around the tandoor clear of any combustible materials or flammable liquids.
- Ensure the flow of combustion and air ventilation is not obstructed so that the tandoor operates safely.
- Furthermore, never leave the tandoor unattended while operating.
- Keep children away and do not allow them to operate or play near the tandoor.
- Avoid using the tandoor while under the influence of alcohol or drugs as it may impair your judgment.
- Moreover, do not move the tandoor while it is in operation.
Placement of the Tandoor
- Clearance: Maintain a clearance of at least 15 cm (6 inches) from both sides and the back of the unit to ensure safe operation.
- Ventilation: Remember, this equipment should only be installed under a ventilation hood.
Safety Measures
- Gas Valve: Always turn off the gas valve when the tandoor is not in use so that no gas is flowing.
- Wheel Locking: Ensure at least two wheels are locked during operation in order to prevent movement.
Flexible Hose & Regulator
- Keep grease and hot materials away from the flexible Hose and regulator, and inspect it visually before each use.
- Additionally, conduct a leak test before lighting the tandoor each day or after any gas component replacement.
Warning: If you fail to follow these instructions, it may result in a fire, causing severe injury or death.
Leak Test Procedure
Perform a leak test before lighting the tandoor to check for gas leaks. Make sure to do this in a well-ventilated area away from open flames.Items Needed
- Solution: Mix 50% liquid dish soap with 50% water.
- Application: Use a brush or cloth to apply the solution.
Areas to Test
- All flexible connector connections.
- All valve connections and pipe joints.
- With the gas supply valve off, turn on the main gas valve without lighting the burners.
- Apply the soap solution to all connections so that bubbles form if there is a leak.
- Look for growing bubbles, which indicate a leak.
Warning: If a leak is detected, shut off the gas source immediately and contact a technician. Failing to do so may cause a hazardous fire.Quick Guide for Performing the Leak Test
Using Your Tandoor Correctly
-
- Lid Position: Always cover the tandoor when not in use. However, avoid fully covering it while in operation so that heat can escape safely.
- Metal Plate Assembly: Step-by-Step Guide for Assembling the Metal/Baffle Plate
Cleaning & Maintenance
- Burner: Clean the burner at least twice a year with a brass bristle brush, ensuring all ports are clear. If you notice any cracks or damage, replace the burner.
- Metal Plates: Scrub the plates using a stiff brass brush and mild detergent. Remove rust with a scrub pad. Additionally, replace the plate if there is excessive wear.
- External Surface: Clean the stainless steel exterior daily with a wet cloth and disinfectant. Make sure to remove any grease or dust before lighting the tandoor.
- Skewers: Keep your Tandoor Skewers sparkling clean by giving them a quick scrub with warm soapy water after each use – it’s the secret to perfectly grilled flavors every time!
Warning: Too much grease buildup can lead to fire hazards and promote the growth of bacteria.
Curing the Clay Pot for First-Time Use
- Curing Process: Before using the Tandoor Oven, cure the clay portion to seal and extend its lifespan. For optimal results, repeat every 2-3 months.
Ingredients:
- Mustard oil: 1.5 liters
- Jaggery (Gur): 1 kg
- Spinach (Palak): 1 kg
- Salt: 10 teaspoons
- Turmeric powder (Haldi): 10 teaspoons
Directions:
- Mix the ingredients until they form a liquid.
- Apply the mixture to the clay pot using a cloth.
- Let the tandoor absorb the mixture for 30 minutes, then repeat the process three times.
- Light the tandoor on low heat for 48 hours.
- Once cooled, remove any remaining mixture with a soft cloth.
Your Tandoor’s First Steps: Complete Guide to Curing and Seasoning:
For T & A Models
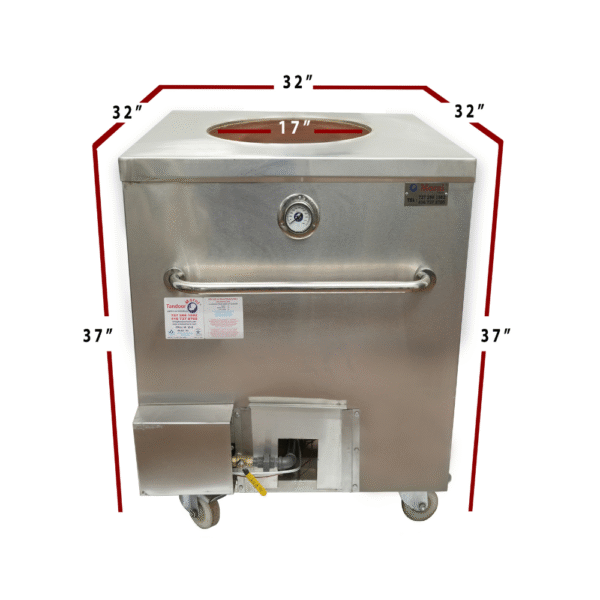
Operation Manual for T & A Models
(T02, T04, T06, A02, A04, A06 )
Note: This appliance is designed for indoor use only and must be operated under a ventilation hood.
Our Certifications
Warnings & Recommendations
- Certified Gas Technician Required: You must hire a certified technician to install and connect your tandoor to the main gas line. Do not attempt to connect it yourself.
- Use of Certified Flexible Gas Hose: The gas technician must use a blue, flexible hose that is CSA certified for the gas connection.
- Securing the Tandoor: Secure the tandoor to the wall using a chain for added stability and safety.
- Lid Usage: When operating the tandoor, never fully cover the top and side lids, as excessive heat buildup could damage the gas components and crack the clay.
- Cleaning: Clean the interior floor of the Tandoori Oven every 3-4 days to remove burned residues, as these are harmful to health and can also damage gas components.
- Gas Valve Operation: The yellow gas valve outside the tandoor controls the gas flow to the burner. Adjust it as needed, but never operate the tandoor at full heat capacity; doing so may cause damage to the gas components and the clay pot.
- Flammable Vapors: Do not store or use gasoline or any other flammable vapors near the tandoor or other appliances. Ignoring this may result in hazardous fires or explosions, leading to serious injuries or property damage.
Note: It is your responsibility to ensure that your tandoor is properly assembled, installed, and maintained. Carefully following this manual’s instructions is crucial for safety.
For Your Safety
If you smell gas:- Turn off the gas supply to the appliance.
- Extinguish any open flames.
- Lift the tandoor lid.
- If the odor persists, immediately contact your gas supplier or the fire department.
Step-by-Step Guide: Lighting up the T Model Tandoors for the First Time:
Installation Guidelines
The installation must follow local codes. In the absence of such codes:- In the U.S.A.: Follow the National Fuel Gas Code ANSI Z223.1/NFPA 54.
Safety Tips for Installation
- Indoor Use Only: Use the tandoor only indoors, under a ventilation hood.
- Clear Area: Always keep the area around the tandoor free of combustible materials, gasoline, or other flammable liquids.
- Ventilation: Do not block the combustion or air ventilation flow to the tandoor.
- Unattended Operation: Do not leave the tandoor unattended while it is in operation.
- Children and Safety: Ensure children do not operate or play near the tandoor.
- Alcohol and Drug Influence: Avoid using the tandoor under the influence of alcohol or drugs.
- Tandoor Movement: Do not attempt to move the tandoor while it is in use.
Clearance Instructions: When positioning your tandoor, maintain a minimum clearance of:
- 15 cm (6 inches) from both sides.
- 15 cm (6 inches) from the back.
- This equipment must be installed under a ventilation hood only.
Electrical Caution
- If any accessory on the tandoor requires an external power source, ensure it is grounded according to local laws or, if absent, with the Canadian Electrical Code CSA C22.1 or the National Electrical Code ANSI-NFPA 70 in the U.S.
- The three-prong plug provides shock protection. Plug it directly into a properly grounded receptacle. Do not cut or remove the grounding prong.
- Keep electrical cords and fuel supply hoses well away from heated surfaces.
Additional Safety Measures
- Always turn off the Gas valve when the tandoor is not in use.
- Lock at least two of the tandoor’s wheels during operation to prevent movement.
Flexible Gas Hose & Regulator
-
- Keep grease or other hot materials away from the flexible Gas Hose, ensuring it does not come into contact with any hot surfaces.
- Visually inspect the entire flexible connector assembly before each use.
- Perform a leak test before lighting the Gas Tandoor each day or after any gas component replacement.
Warning: Ignoring these instructions may result in a fire, causing serious injury or even death.
Performing a Leak Test
A leak test ensures there are no gas leaks before using the Clay Oven. Conduct the test in a well-ventilated area, away from open flames, heat, or ignition sources. Do not use a match or any open flame during the test.What You’ll Need
- A mixture of 50% liquid dish soap and 50% water.
- A brush or cloth to apply the mixture.
Leak Test Procedure
- Test the flexible gas hose connections, valve connections and all joints of your tandoori oven.
- With the gas supply valve in the OFF position, turn on the main gas valve.
- Brush the soap and water solution onto all connections and components.
- Watch closely for growing bubbles; these indicate a leak.
- If a leak is detected, do not use the tandoor. Shut off the gas source immediately and contact a certified gas technician for repairs.
Warning: Failing to perform this test correctly may lead to a hazardous fire or explosion.
Quick Guide for Performing Leak Test
Using Your Appliance Correctly
Lighting
- Before each use, inspect all hoses and gas supply lines for any visible damage. If any damage is found, do not use the tandoor.
- Important:
- Always remove the lid before lighting.
- Do not lean over the tandoor when lighting the burner.
- Check the flame visually each time. If the flame is unusually small or smoky yellow, turn off the tandoor and call a certified technician.
- Note: Always light the Tandoor from side window. Never ignite it from the top.
First-Time Lighting Procedure
- Remove the top lid before lighting.
- Turn off the yellow gas valve at the front.
- Open the main gas valve located before the blue flexible hose.
- Check all gas connections for leaks using an approved leak detector.
- Press and hold the red button on the safety valve, then light the pilot. Hold the Red button for at least 2 minutes.
- Once the pilot is lit, slowly turn on the yellow gas valve at the front to light the burner.
Shutting Down Your Tandoor
- Nightly Shutdown: Turn off the yellow gas valve at the front to keep the pilot lit.
- Complete Shutdown: Turn off both the main gas valve before the blue flexible hose and the yellow valve at the front.
Lid Position
- Always keep the tandoor covered with the lid when not in use.
- When using the tandoor, do not completely cover it with the lid.
- Metal Plate Assembly: Step-by-Step Guide for Assembling the Metal/Baffle Plate
Cleaning & Maintenance
- Burner: Clean the burner at least twice a year using a brass bristle brush. Ensure all burner ports are clear, but do not enlarge them. If damage is found, replace the burner.
- Metal Plates: Scrub the plate with a brass brush and wash with mild detergent. If rust appears, use a scrub pad to remove it. Replace the plate if excessive wear is evident.
- External Surface: Clean the tandoor’s external stainless steel surface daily with a wet cloth and kitchen disinfectants. Ensure all grease, dust, and food particles are removed before lighting.
- Skewers: Keep your skewers sparkling clean by giving them a quick scrub with warm soapy water after each use – it’s the secret to perfectly grilled flavors every time!
Warning: Too much grease buildup can lead to fire hazards and promote the growth of bacteria.
Curing the Clay Pot for First-Time Use
- Preparation: You must cure the tandoor’s clay portion before first use to seal and treat it, which extends its lifespan. Repeat every 2-3 months for best results.
Ingredients
- Mustard oil: 1.5 liters
- Jaggery (Gur): 1 kg
- Spinach (Palak): 1 kg
- Salt: 10 teaspoons
- Turmeric powder (Haldi): 10 teaspoons
Directions
- Mix the ingredients into a liquid.
- Rub the mixture onto the clay using a cloth.
- Allow the tandoor to absorb the mixture for 30 minutes. Repeat steps 2 and 3 three more times.
- Heat the tandoor slowly for 48 hours.
- Once cooled, wipe off any remaining mixture with a soft cloth.
Your Tandoor’s First Steps: Complete Guide to Curing and Seasoning:
Other Useful Links:
Step-by-Step Guide for Replacing the Thermocouple
For Charcoal & Wood Fired
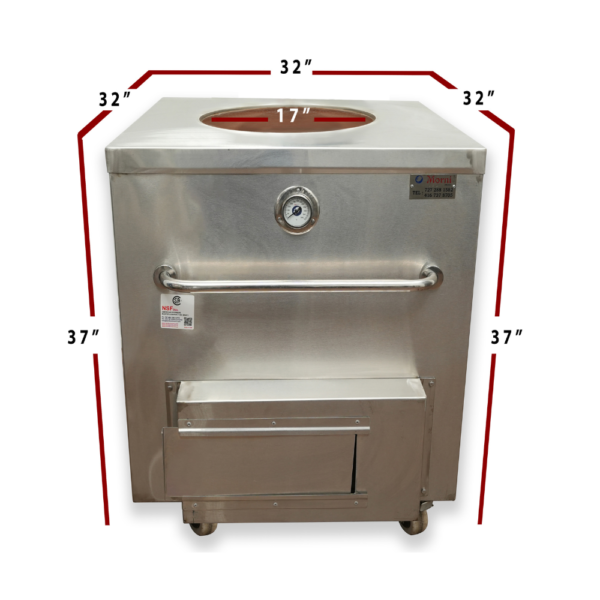
Operation Manual for Charcoal & Wood-Fired Tandoors
(CS03, CS04, CU02, CU04, CU06, R26, R28, R32 )
Operating Your Tandoor
- Curing the Clay Pot: Before using the tandoor for the first time, it is essential to perform the curing of the clay pot. This process seals and treats the clay, extending the life of your tandoor.
- Charcoal for Charcoal-Operated Tandoors: For charcoal-operated models, you can purchase charcoal either online or from a restaurant supply store. Make sure you have enough on hand before operating.
- Heat-Up Time: In the morning, the tandoor typically takes around 30 minutes to heat up. Therefore, plan your cooking schedule accordingly.
- Training Resources: If you are not a trained chef, it is recommended to visit YouTube and watch instructional videos on operating the tandoor safely and efficiently.
- Stability: For added safety, always secure the oven to the wall to prevent any movement during use.
- Lid Usage: While operating, avoid completely covering the top and side lids, as this can cause overheating and potential damage.
- Cleaning Routine: To maintain hygiene, clean the oven floor every 3-4 days. This helps prevent residue buildup, ensuring better performance.
- Lighting Procedure: Never light your tandoor from the top; instead, always light it through the side window for safety.
- Temperature Caution: Avoid using the tandoor at full heat capacity, as doing so may damage its components.
- Storage of Flammable Substances: Do not store any flammable substances near the oven to prevent fire hazards.
- Indoor Use: If using the tandoor indoors, it is necessary to have a canopy hood installed, as carbon dioxide and carbon monoxide emissions can be harmful.
Step-by-Step Guide: Lighting up the Charcoal or Wood-Fire Model Tandoors for the First Time:
Tandoor Fire Prevention
- Preventing Grease Buildup: Excessive grease or residue on your cooking system can increase the risk of fire. Therefore, it’s crucial to clean your cooking system regularly.
- Cleaning Guidelines: Follow the manufacturer’s instructions carefully for proper cleaning and maintenance to ensure the tandoor remains safe and efficient.
Tandoor Lid Position
- When Not in Use: Always keep the tandoor covered with the lid to maintain cleanliness.
- During Operation: However, while using the tandoor clay oven, do not cover it completely with the lid, as this can cause overheating.
Tandoor Maintenance and Cleaning Tips
- Ash Removal: Remove the ash from the tandoori oven the next morning, once it has returned to a safe temperature. This helps prevent residue buildup that can affect performance.
- Cleaning Residue: Use a broom or vacuum to effectively clean the residue left inside the tandoor.
- External Cleaning: Clean the external stainless steel surface daily with a wet cloth and disinfectant. This keeps the tandoor hygienic and looking its best.
- Skewers: Keep your skewers sparkling clean by giving them a quick scrub with warm soapy water after each use – it’s the secret to perfectly grilled flavors every time!
Curing the Clay Pot for First-Time Use
- Initial Preparation: Before you start the tandoor for the first time, you must prepare the clay portion. This process seals and treats the clay, which in turn extends the lifespan of your tandoor.
- Routine Maintenance: For the best results, repeat this procedure once every 2-3 months.
Ingredients:
- Mustard oil: 1.5 liters
- Jaggery (Gur): 1 kg
- Spinach (Palak): 1 kg
- Salt: 10 teaspoons
- Turmeric powder (Haldi): 10 teaspoons
Directions:
- Mix (grind) the ingredients in a pot until they form a liquid.
- Using a cloth, rub the mixture on the clay portion of your tandoor thoroughly.
- Let the tandoor absorb the mixture for 30 minutes. Then, repeat steps 2 and 3 three more times for complete curing.
- Light your tandoor on low heat for 48 hours to allow the clay to set.
- After the tandoor cools down, use a soft cloth to remove any remaining mixture, ensuring the surface is clean and ready for use.
Your Tandoor’s First Steps: Complete Guide to Curing and Seasoning:
- Commercial Tandoors
- Catering Tandoors
- Copper Tandoors
- Domestic Tandoors
- Accessories
-25%

-25%
-25%
-25%

-25%

-25%
-25%